Game Reviews 42 RPGs 55 Arcade 34 Puzzle 18 Platform 10 Strategy Sections QB News Site Archives Game Guides Our Projects Entertainment Awards QB Links Interact QB Chatroom Mailing List Submissions Link to Us Job Openings Sometimes a different look or atmosphere can change the entire feel of the game. Thanks to Autumn Spring Entertainment, you can change the "feel" of their update of the Sega puzzle game Columns by changing the in-game graphics, sound, and screen's layout. In this game guide, we'll teach you how to add your own graphics skin to Autumn Spting's Columns game. Because of the construction nature of this game guide, we've decided to split up this game guide into six different "steps". If you'd like to know how to do a specific part of this task or you want to re-read a section, use the links below: Step
#1: Prepare Your Apps
Step #1: Prepare Your Apps 
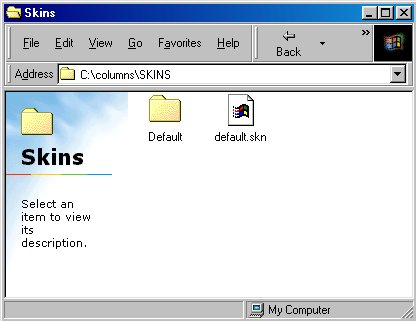
Soon you too will make great Columns v1.1 skins like this Akari Kamigishi skin from Chibi-Usa. For this project, you're going to need a copy of Columns v1.1, which can be downloaded by clicking here. Unzip this copy of Columns to the "C:\COLUMNS" directory. If you do this right, you should be able to run "COLUMNS.EXE" from the directory "C:\COLUMNS". Don't worry if you don't want Columns v1.1 there; you can move it once you're done with this project. Note: Before going headfirst into this Game Guide, please run Columns at least once to make sure it works on your computer. What a waste of time and effort it would be if Columns doesn't even run on your computer! The next thing you'll need is a paint utility that supports GIF, JPG, and BMP files (with a huge glaring emphasis on the BMP file format). Autumn Springs recommends Paint Shop Pro as the utility for this project, but Microsoft Paint or any other BMP utility will work just as well. Finally, you'll need a text-editing utility (Notepad or Wordpad). Later on in this Game Guide, we'll teach you how to write the skin file needed to add your beautiful graphics design to the Columns game. But first... Step #2: Make a Skin Directory For Columns v1.1, all the files for each skin project are stored in the SKINS subdirectory. If you followed Step #1 correctly, you can access that directory by going to "C:\COLUMNS\SKINS".
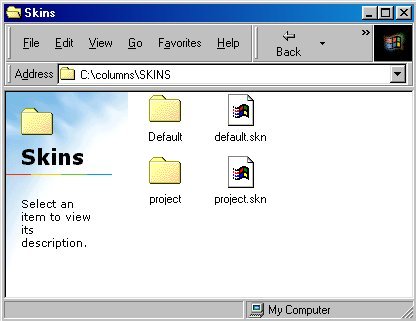
You'll see two things in the SKINS directory: a subdirectory called "Default" and a file called default.skn. Make a copy of both the directory and the .skn file onto the C:\COLUMNS\SKINS directory. You have to rename both the name of the folder and the .skn file for your new project. You can use any name in the world, but the name of the folder has to match the name of the .skn file. For demonstration purposes, we named the new directory "PROJECT" and the new .skn file "PROJECT.SKN".
Step #3: Let's Make a Picture This is the fun step. To make a graphics skin for Columns v1.1, you'll need a 640*480 BMP file that has space set aside for the Columns playing field. You can make the graphic design you want to start with from scratch, or you can download an image off the Internet to be your background. You can choose any image in the world, but for this demonstration, we picked a picture of Playboy Playmate of the Year 1990 Lisa Matthews (who would make a great person for our skin file, pun intended):
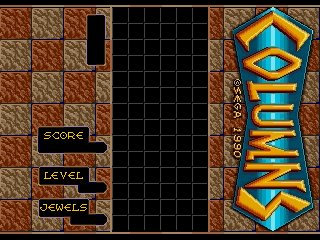
This image of Lisa is obviously not 640*480 pixels, but at a slim 451 pixels wide, she almost fulfills the width requirement of the 640*480 image we want to create. The rest of that width will be taken up by the Columns playing field. You don't need to make one from scratch; instead, crop it from the file "C:\COLUMNS\SKINS\DEFAULT\MAIN.BMP". You'll also want to have space in your design for a scorebar, a display for your level and jewels, and a box showing your next piece.
As you can see from above, you can orient the playing field, the scorebar, and the other displays any way you wish. For this particular project, we didn't want any of the in-game features to draw over Lisa's face or her body, so the playing field was forced to the extreme left and the displays are placed on the upper right of the image. Once you have a 640*480 BMP you're satisfied with, save that BMP as "C:\COLUMNS\SKINS\PROJECT\MAIN.BMP". After you do that, use your paint editor to resize your BMP to 384*288 pixels. This new BMP you've made is called the snapshot of your skin, which serves as a preview of the background you've just made. Save this 384*288 BMP as "C:\COLUMNS\SKINS\PROJECT\SCRSHOT.BMP". Step #4: Adjusting your Skin File Now that you have a new graphics skin that you want to use in the Columns file, you have to make all the changes necessary to implement the skin you've made. You can do that by accessing the skin file. The skin file for this project is "C:\COLUMNS\SKINS\PROJECT.SKN". Open this file with your text editor. Now make the following changes as you scroll down the text file: 1. On the lines that read # The name of the skin
Replace "Classic Columns" with the name you'd like to give your project. 2. On the lines that read # The author's name
Replace "Benjamin Stauffer" with your name. 3. On the lines that read # The date the skin was created
Replace "24 Dec 2000" with today's date, using the same format. 4. On the lines that read # The date the skin was created
Replace "24 Dec 2000" with today's date, in that format. 4. Replace the three-line description in this line, # --No-longer-than-this-line-------------
with a three-line description of your graphics skin. You're almost there... Step #5: Adjust the Coordinates for the Playing Field This is the most complicated step of the entire game guide, but it's a very necessary one. For Columns to work properly with your game, you have to tell the computer where the playing field is located. That means providing some coordinates. If you keep scrolling down from PROJECT.SKN, you'll see a few lines that look like this: # X,Y coordinates of the playing field
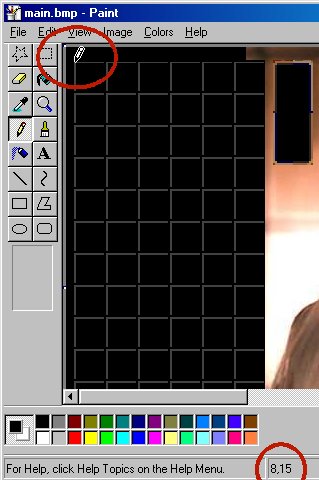
The next step is to replace the line "FieldXY 224,16" with the coordinates of the upper-left corner of your playing field. Now how are you going to find that out? Fortunately, paint utilities usually come with an answer for this problem. If you look around your drawing utility, you should find a couple of numbers that change whenever you move the mouse. Coincidentally, these happen to be the coordinates you're looking for.
Now move the mouse cursor to the coordinates of the upper left corner of the playing field, as shown above. Record the numbers on your design in your memory, return to your text editor, and replace the line "FieldXY 224,16" with the coordinates of your playing field. For example, in our demonstration skin, the coordinates of the upper left corner are on 8,15. So we replaced the line with "FieldXY 8,15". Note: Make sure you leave a space in between each comma and the following coordinate. Example: 123,
45 (correct, space in between
the comma and 15.)
Anyway, use your newfound coordinate-finding technique to do the remaining steps: 1. On the lines that read # X,Y coordinates of the "Next piece"
box
Replace "176, 32" with the upper-left coordinates of your next piece box. 2. On the lines that read # X,Y coordinates of the score
Replace "112, 289" with the upper-left coordinates of where you want the score to be located. 3. On the lines that read # X,Y coordinates of the level
Replace "175, 369" with the upper-left coordinates of where you want the level indicator to be located. 4. On the lines that read # X,Y coordinates of the number of
jewels cleared
Replace "159, 433" with the upper-left coordinates of where you want the jewels collected display to be located. 5. (The last step!!) On the lines that read ### Backgrounds # Information for each background
Remove the line that reads "BKG MAIN2.BMP, 128, 128, 128". Congratulations! You've made your own program for the graphics skin! But like every good programmer, you can't celebrate the fruits of your labor until you... Step #6: Test to See if The Darn Thing Works Here's the moment of truth: if you've followed through this game guide correctly, you should be able to play Columns with your new graphics skin! Instructions how to Play Columns with your New Graphics Skin: 1. Run "C:\COLUMNS\COLUMNS.EXE".
As you can see, our demonstration program was a tremendous success. If you didn't get to implement your graphics skin correctly, try retracing your steps through this game guide. We've stumbled plenty of times ourselves trying to figure out what makes Column's skin feature tick. If worse comes to worse or you're experiencing technical problems with the game, you could also try going to the Autumn Spring's Columns Project page. As a bonus for reading this entire tutorial through, you can download the Columns skin we made. Note that additional changes were made to the cusotm skin that were not covered in this Game Guide, including an updated font and a bit of classical music. Download
If you were successful with implementing your own graphics skin, you should now be comfortable enough with the Columns skin file format to customize other features in the game. Look through the readme file provided with the game to learn how to change the music, sound effects, the font, and the gem graphics for the game. There's still quite a bit to learn, but if you put your heart into it, you could make something that would make geniuses like Yuji Naka and Hugh Hefner proud. Columns v1.1 Game Guide Written by Vance Velez |
V Planet! Archive
Site Highlights
Site Watch
Affiliates
Links |